Keep this handy at the table
Quick scoring reference
- Record the full track score, including completed laps.
- Add 1 point per unsold good and silverling.
- Add 1 point per complete pair of workers.
- Award final bonuses from placed yellow tiles.
After the fifth phase
Finish the fifth and final phase, E, including its normal end steps. Keep your estate and personal supply in place for final bonuses. Do not gather up yellow tiles early, or you will need to reconstruct their scoring conditions.
Start with the victory point track. If your marker completed a lap, include the hundred shown by the 100/200 tile. A marker at 38 after one lap means 138 points. The space beside the marker is not always the full score.
What should already be on the track?
During play, your marker advances for selling goods, placing animals, completing regions and other actions. These form the starting total for final scoring. Do not rescore every animal or completed region using the final estate layout.
A useful check: completing a region normally scores for its size plus the current phase bonus. If you missed this during play, reconstruct that award separately from the game's history. The final calculator cannot infer when a region was completed from its size alone.
What to add at game end
Sort remaining items into goods, silverlings and workers. Count individual goods tiles, rather than stacks or different colors. Five identical unsold goods score 5 points.
Group workers into pairs. Seven tokens form three complete pairs, worth 3 points; the leftover worker scores nothing. Round down: 3.5 is not a valid score here.
| Category | How to score |
|---|---|
| Unsold goods | 1 point per remaining tile |
| Silverlings | 1 point per remaining silverling |
| Workers | 1 point per complete pair of tokens |
| Yellow tiles | Resolve only their end-game scoring effects |
Scoring yellow tiles
Review yellow tiles actually placed in your estate. Some change actions during play; others award end-game points. For each final-scoring tile, read its condition and count qualifying items. Add these bonuses into a separate total.
A tile left in your personal storage does not award this bonus. A yellow tile does not score merely because it is yellow: it needs a relevant effect. If several placed tiles score different features of one building, check each condition independently.
Worked example: from 138 to 161 points
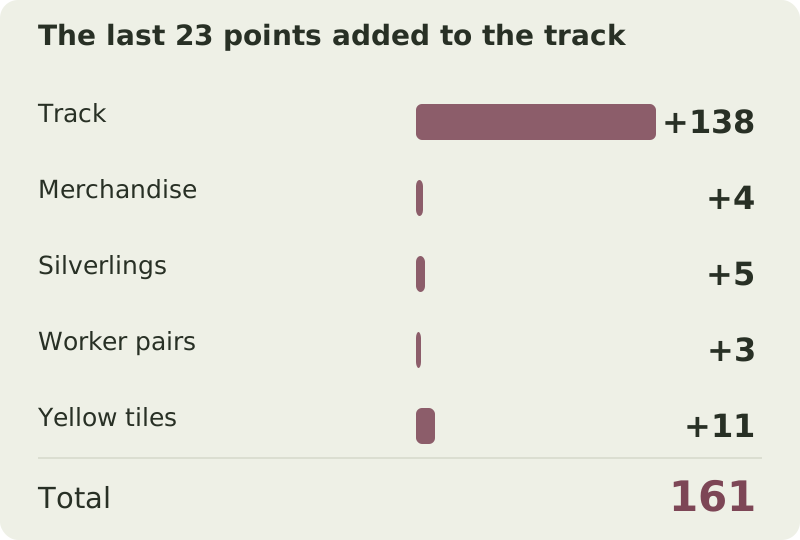
Iris has 138 on the track, with 4 unsold goods, 5 silverlings and 7 workers remaining. Her yellow tiles award another 11. First total the final additions: 4 + 5 + 3 + 11 = 23.
Add 23 to 138 to reach 161. Completed regions do not appear separately because their points are assumed to be included in the 138. The table gives one player's complete final calculation and can serve as a template for the others.
| Category | Calculation | Points |
|---|---|---|
| Track | Already earned during play | 138 |
| Merchandise | 4 × 1 | 4 |
| Silverlings | 5 × 1 | 5 |
| Workers | 7 ÷ 2: three complete pairs | 3 |
| Yellow tiles | Total from fulfilled conditions | 11 |
Work it out138 + 4 + 5 + 3 + 11 = 161 points
Who wins a points tie?
Compare final victory points first. A tie goes to the player with more empty estate spaces. This is a special tiebreaker, not a penalty for filling your board: empty spaces add and subtract no points themselves.
If empty spaces are also tied, the player further back on the turn order track, or bridge, wins. With equal points and empty spaces, fourth position beats second. Do not replace this rule with remaining workers or silverlings: those already contributed to the score.
Entering the example in the calculator
Enter Score track 138, Unsold goods 4, Silverlings 5, Workers 7 and Yellow tiles 11. The result should be 161. Workers takes a token count, so do not divide the seven beforehand.
Empty estate spaces and Turn order position are tiebreaking inputs, not scoring categories. Use the actual final values: a missed item can change the ranking even when the point total looks plausible.
Editions and extra modules
The general base-game ending is shared by classic and updated editions, but individual yellow tile text and modules can differ. Use your copy's reference. The calculator takes an already calculated yellow-tile total and does not identify effects by tile number.
An extra module may change scoring during play or add final bonuses. Calculate these under its rules, then check whether they are already on the track. Team and solo modes should not be treated as ordinary individual games based on this guide alone.
Common mistakes
- Scoring every estate region again. Add only points not already awarded.
- Forgetting a completed hundred. Check the 100/200 tile as well as the marker position.
- Rounding an odd worker count upward. A lone worker scores nothing.
- Scoring a yellow tile still in storage. Its final effect requires placement.
- Choosing fewer empty spaces as the tiebreaker. Under these rules, more empty spaces wins.
Try it yourself
Try the example with your own numbers
Change the values to see how the score changes. This is a practice calculation; your saved game in the calculator is kept separately.
Questions & answers
Do empty spaces incur a penalty?
Not in normal base-game final scoring. They break victory point ties in favor of the player with more empty spaces.
What do 5 workers score?
2 points: two complete pairs and one leftover worker.
Should sold goods score again?
No. Their points were awarded during play. Only unsold goods are added separately at game end.
Sources and verification
Prepared by Board Game Scoreboard. Rules checked against the sources below on November 17, 2026; the worked example is checked during each site build. If editions differ, follow the rulebook included with your copy.
- The Castles of Burgundy — official Ravensburger rules, page 9 ↗
- The Castles of Burgundy — Ravensburger game page ↗
Ready to score your game?
Enter each player's results to see the total and a full breakdown.
Go to calculator ↗